
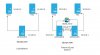
We can design sip networks with openSIPS or Kamailio as a sip load balancer in many ways based on requirement and availability of resources. Refer to the below illustration in which load balancing and HA are designed at openSIPS level . You can also implement HighAvailability at freeswitch node levels using shared freeswitch core database.
For high availability you need multiple openSIPS nodes. We use keepalived for IP failover . We will discuss a step by step procedure to configure failover and Load balancing with OpenSIPS for Freeswitch. If you do not require FailOver for openSIPS , you can skip to Step 2 .
STEP 1 Install and configure keepalived :
Install keepalived on all openSIPS nodes with following command.
# yum install -y keepalived
configure keepalived on the nodes on which you are going to install openSIPS
# vim /etc/keepalived/keepalived.conf
Use below configuration . Replace email and Virtual IP details with yours .
global_defs {
notification_email {
youremail@yourdomain.com
}
notification_email_from opensips@example.com
smtp_server 127.0.0.1
smtp_connect_timeout 30
router_id LVS_DEVEL
}
vrrp_instance OS_1 {
state MASTER
interface eth0
garp_master_delay 10
smtp_alert
virtual_router_id 50
priority 9
advert_int 1
nopreempt
authentication {
auth_type PASS
auth_pass 11111
}
virtual_ipaddress {
10.10.10.10/24
10.10.10.10/24 label eth0:1
}
and on second openSIPS use the below configuration .
global_defs {
notification_email {
youremail@yourdomain.com
}
notification_email_from opensips@example.com
smtp_server 127.0.0.1
smtp_connect_timeout 30
router_id LVS_DEVEL
}
vrrp_instance OS_2 {
state BACKUP
interface eth0
garp_master_delay 10
smtp_alert
virtual_router_id 50
priority 9
advert_int 1
nopreempt
authentication {
auth_type PASS
auth_pass 11111
}
virtual_ipaddress {
10.10.10.10/24
10.10.10.10/24 label eth0:1
}
Enable keepalived service and start it on both the nodes.
# systemctl enable keepalived
# systemctl start keepalived
STEP 2. Install openSIPS :
Follow this guide to install openSIPS 2.4 and use below configuration to edit opensips.cfg .
Note that if you are not configuring high availability and hosting mysql database locally on openSIPS only , then you may want to use localhost or 127.0.0.1
and also change database credentials and SIP listening address .
# vi /etc/opensips/opensips.cfg
log_level=4
sip_warning=0
log_stderror=no
log_facility=LOG_LOCAL2
log_name="opensips"
debug_mode=yes
children=4
dns_try_ipv6=no
auto_aliases=no
#advertised_address="12.135.59.0"
mhomed=1
listen=udp:10.128.0.1:5060
mpath="/usr/lib64/opensips/modules"
loadmodule "db_mysql.so"
loadmodule "signaling.so"
loadmodule "sl.so"
loadmodule "tm.so"
loadmodule "rr.so"
loadmodule "uri.so"
loadmodule "dialog.so"
loadmodule "maxfwd.so"
loadmodule "textops.so"
loadmodule "mi_fifo.so"
loadmodule "dispatcher.so"
loadmodule "load_balancer.so"
loadmodule "sipmsgops.so"
loadmodule "proto_udp.so"
modparam("mi_fifo", "fifo_name", "/tmp/opensips_fifo")
modparam("dialog", "db_mode", 1)
#change database credentials below
# if this is the only openSIPS node in network and you are using HighAvailability use mysql database host as localhost or 127.0.0.1
modparam("dialog", "db_url", "mysql://abc:123@11.11.11.11/opensips") modparam("rr", "enable_double_rr", 0)
modparam("rr", "append_fromtag", 1)
modparam("tm", "fr_timer", 2)
#change database credentials below
modparam("dispatcher", "db_url", "mysql://abc:123@11.11.11.11/opensips")
modparam("dispatcher", "ds_ping_method", "OPTIONS")
modparam("dispatcher", "ds_ping_interval", 5)
modparam("dispatcher", "ds_probing_threshhold", 2)
modparam("dispatcher", "ds_probing_mode", 1)
modparam("load_balancer", "db_url", "mysql://abc:123@11.11.11.11/opensips")
modparam("load_balancer", "probing_method", "OPTIONS")
modparam("load_balancer", "probing_interval", 5)
route{
if (!mf_process_maxfwd_header("10")) {
sl_send_reply("483","Too Many Hops");
exit;
}
if (!has_totag()) {
record_route();
}
else {
loose_route();
t_relay();
exit;
}
if (is_method("CANCEL")) {
if (t_check_trans())
t_relay();
exit;
}
if (is_method("INVITE")) {
if (!load_balance("1","pstn","1")) {
log("sreekanth invite method\n");
send_reply("503","Service Unavailable");
exit;
}
}
else if (is_method("REGISTER")) {
if (!ds_select_dst("1", "4")) {
send_reply("503","Service Unavailable");
exit;
}
}
else {
send_reply("405","Method Not Allowed");
exit;
}
if (!t_relay()) {
sl_reply_error();
}
}
Now we need to insert entries in loadbalance and dispatch records
INSERT INTO `opensips`.`load_balancer` (`id`, `group_id`, `dst_uri`, `resources`, `probe_mode`, `description`) VALUES ('1', '1','sip:10.10.10.5 ','vm=100;conf=100;transc=100;pstn=500', '1','FS1');
INSERT INTO `opensips`.`load_balancer` (`id`, `group_id`, `dst_uri`, `resources`, `probe_mode`, `description`) VALUES ('2', '1','sip:10.10.10.4 ','vm=100;conf=100;transc=100;pstn=500', '1','FS2');
and insert records in dispatcher table as well .
INSERT INTO `opensips`.`dispatcher` (`id`, `setid`, `destination`, `socket`, `state`, `weight`, `priority`, `attrs`, `description`) VALUES ('1', '1','sip:10.10.10.5:5060','','0', '1', '1','','FS1');
INSERT INTO `opensips`.`dispatcher` (`id`, `setid`, `destination`, `socket`, `state`, `weight`, `priority`, `attrs`, `description`) VALUES ('1', '1','sip:10.10.10.4:5060','','0', '1', '1','','FS2');
STEP 3. Configure Freeswitch :
In freeswitch /etc/freeswitch/vars.xml change domain to opensips domain name . And reload freeswitch
<X-PRE-PROCESS cmd="set" data="domain=sip.xyz.com"/>